Can’t say doing CTFs is our passion - we do them sometimes for fun, but we’ve never enjoyed it so much as the guys and girls at SCC. On that behalf, congratulations to everyone who participated in the competition and to those who organized it. Big congrats to the winning team “ime tima” and to the three guys - Jovan, Jovan and Marko who built the platform for training and qualifications and brought the national CTF to a new level.
On the other hand, we have always been passionate about building secure products, whether it comes to software or hardware. Past four years, we’ve been working on IoT projects, and let me tell ya - we’ve seen some bad hardware. Our interest in hardware security began while we were teaching at the university. These experiences led us to join the Serbian Cybersecurity Challenge by creating a hardware challenge and one of our goals was also to raise awareness about how insecure hardware can be, highlighting real-world issues.
IoT devices collect data from their environment - pollution of air and water, power consumption, they can track goods in supply chains or a patient’s wellbeing. Very often, the collected data is sensitive or the systems in question are integral components of critical urban infrastructure which are vital for the functioning of society. Systems such as those found in smart cities, encompassing smart traffic light control, autonomous vehicles, and smart electric grids, as well as IoT systems deployed in factories, pose significant risks when compromised or tampered with. Not only can such actions result in data breaches, but they also have the potential to cause substantial damage, including endangerment of people’s health, and general security.
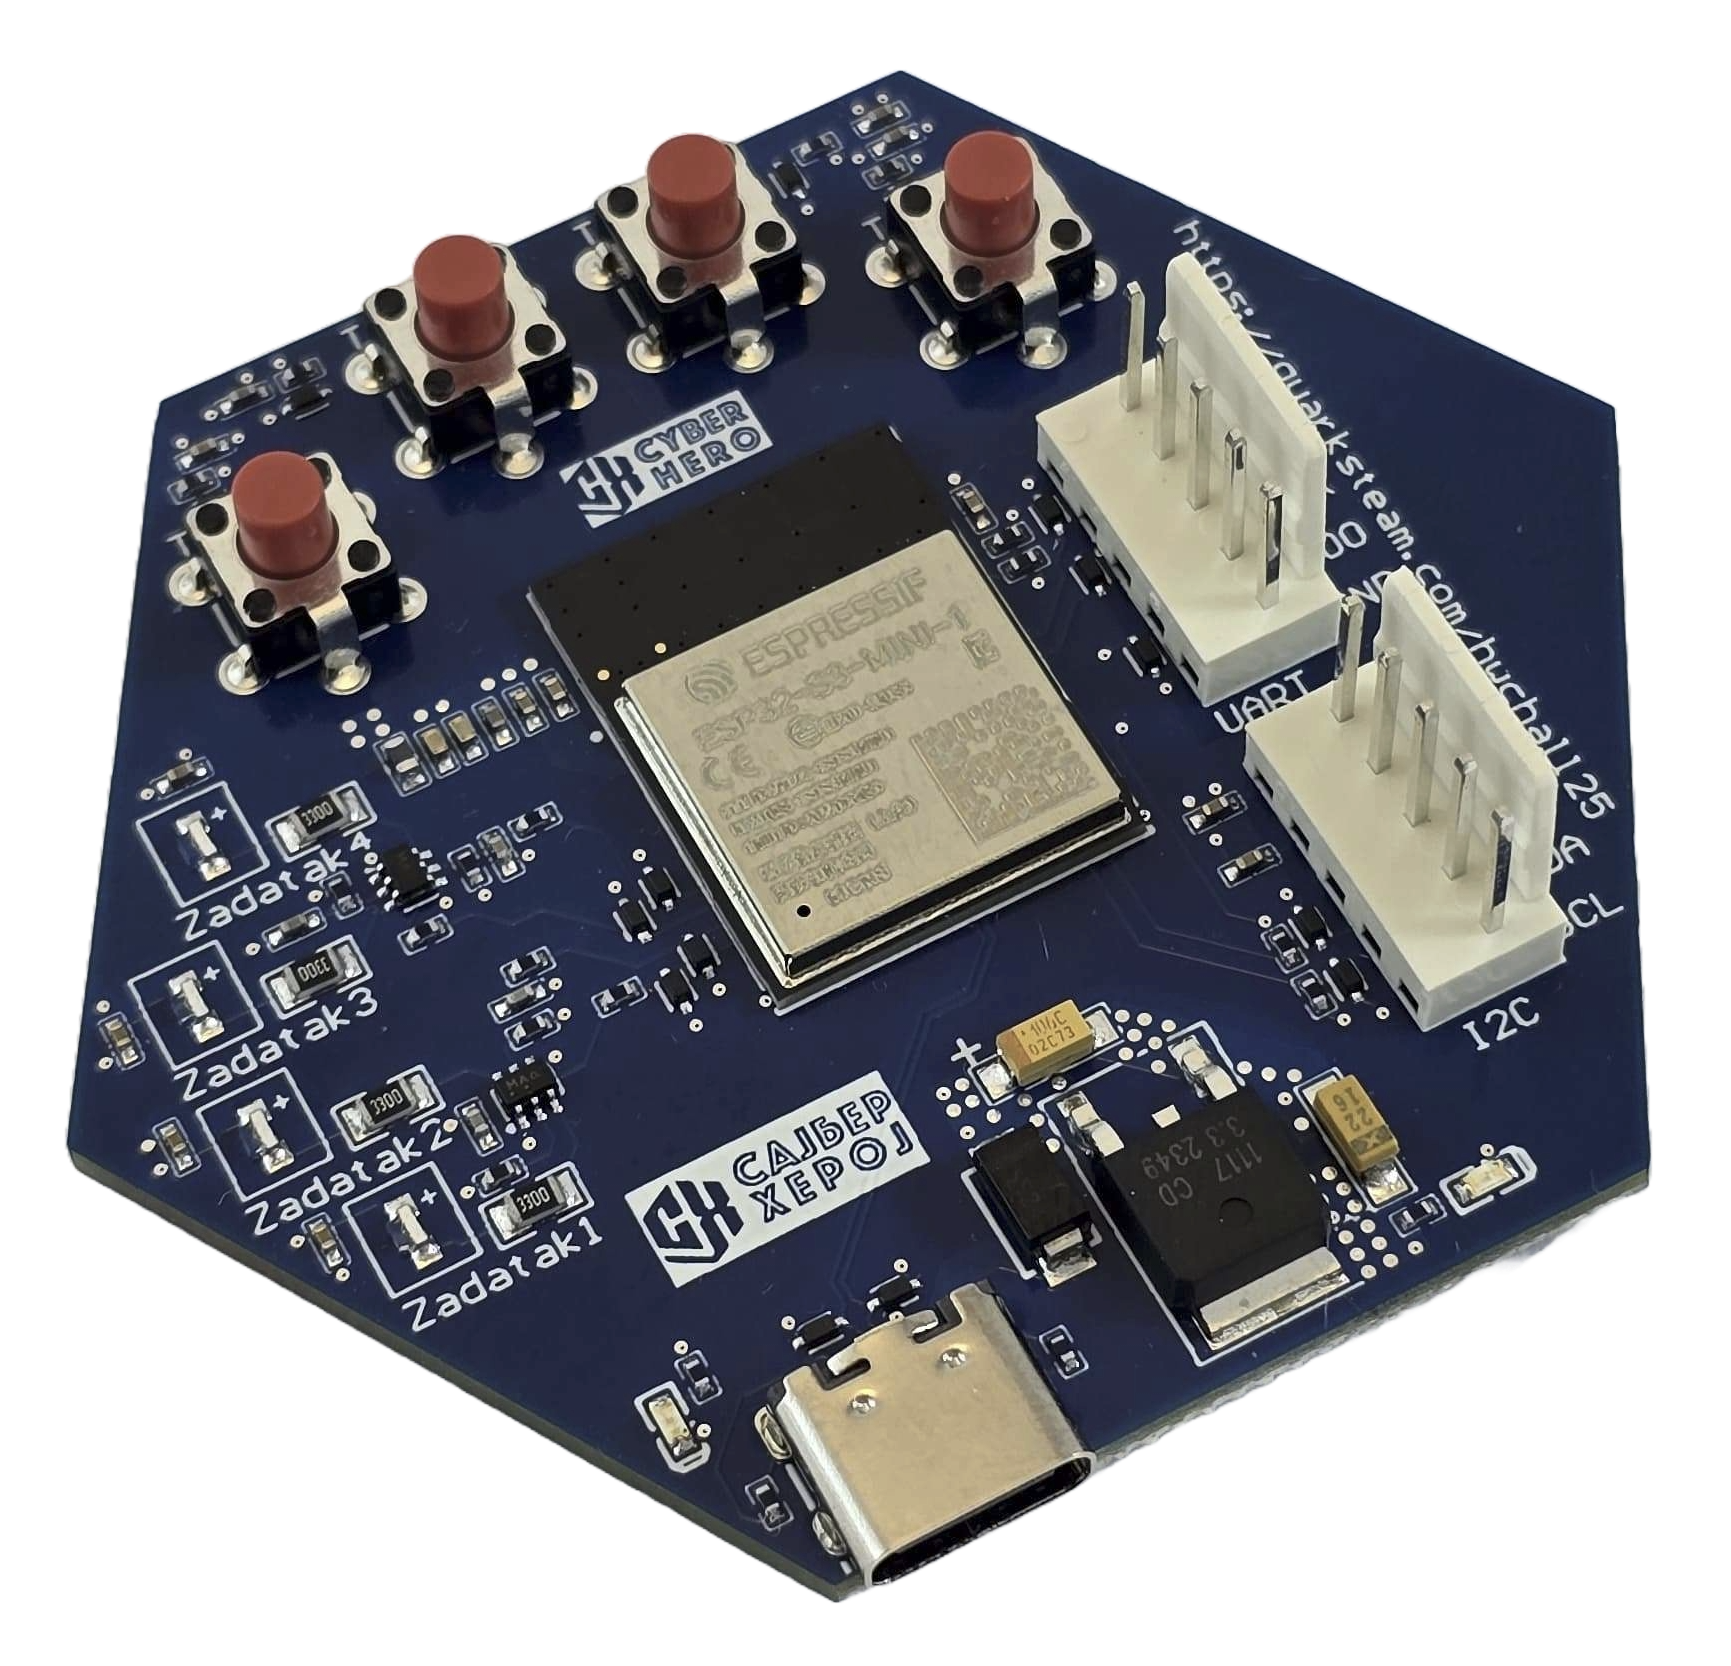
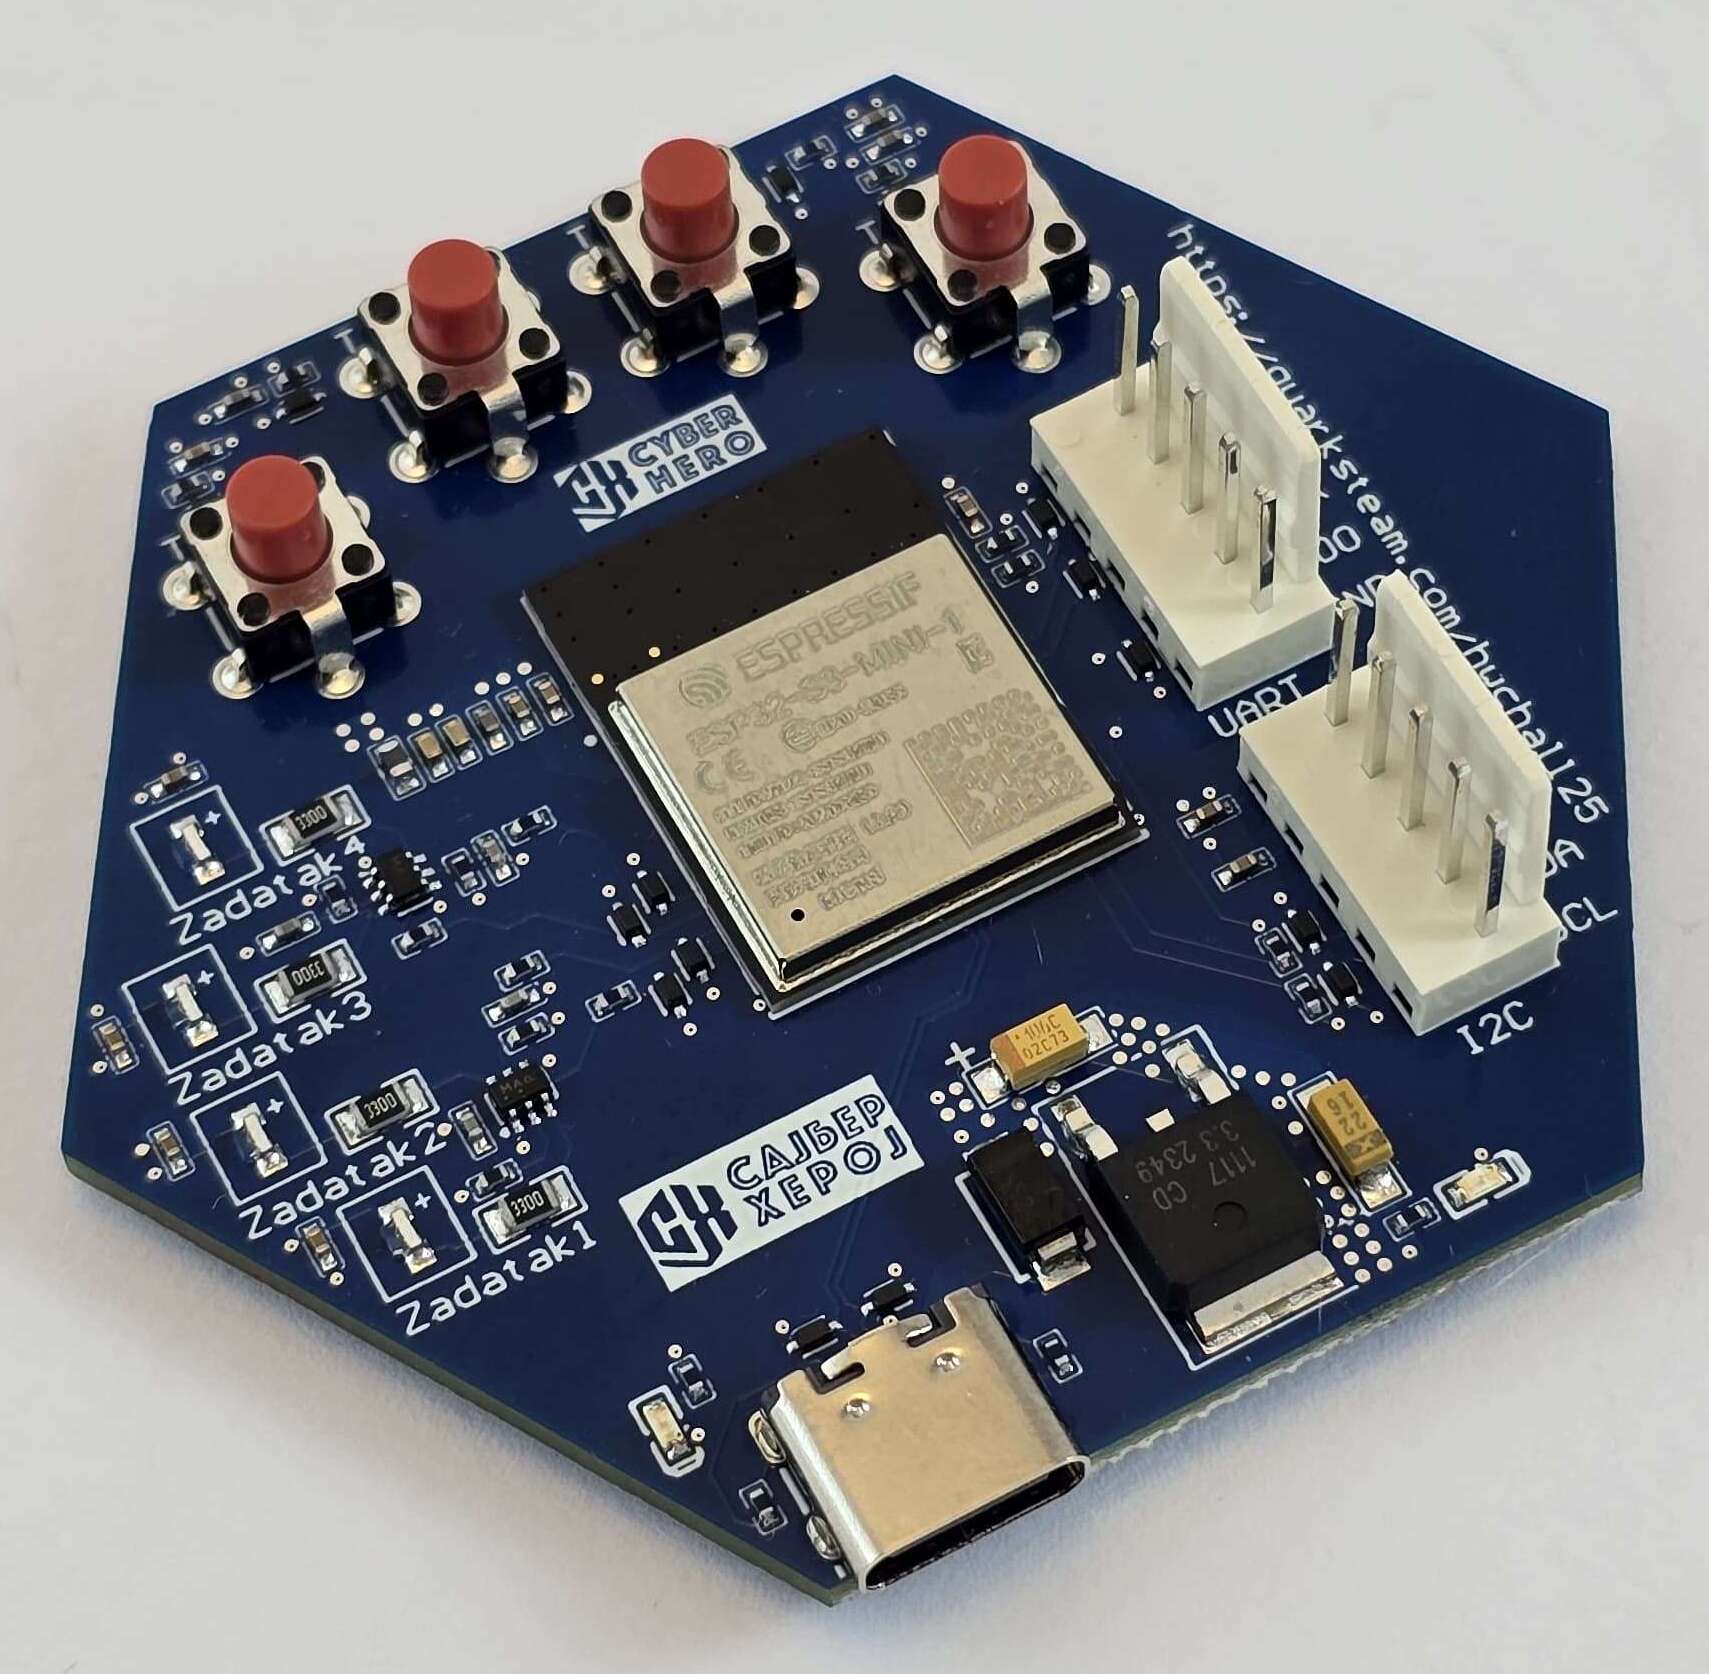
Having that in mind, this time we designed the hardware challenge board using one of the MCUs often used in IoT - ESP32 S3 - exposing vulnerabilities often found in IoT (and other embedded devices) - open debug ports, hardcoded cryptographic secrets, lack of authentication, and more.
Besides the ESP32 S3 MCU, the device has a UART port, an I2C port (not used), a USB C port, 4 buttons - each used to start one of the 4 challenges, and 4 LEDs - each used to identify the ongoing challenge.
The challenge came with a USB to TTL converter, cables and a USB C cable.

Goal: communicate with the device using an exposed UART port
This one was easy - there are 5 pins - RX, TX, VCC, GND, IO0 - it’s UART, obviously. The IO0 pin is used to switch the board to programming mode and flash it. To connect the device to your computer, you should use a USB to TTL converter. Since the device can be powered through the USB C port, you can use three pins:
Device <-----> Converter
TX ------------------ RX
RX ------------------ TX
GND ---------------- GND
The next step is to read the serial output. Since UART is an asynchronous communication protocol, you need to know the baud rate the device uses to send data to the serial console. You also need a serial communication program like minicom, screen or Arduino serial to set the baud rate and read the output. You could try the standard baud rates like 9600, 19200 until you find the right one - or look at the name of the challenge: 0x1C200 which is 115200 (10).
The rest is easy:
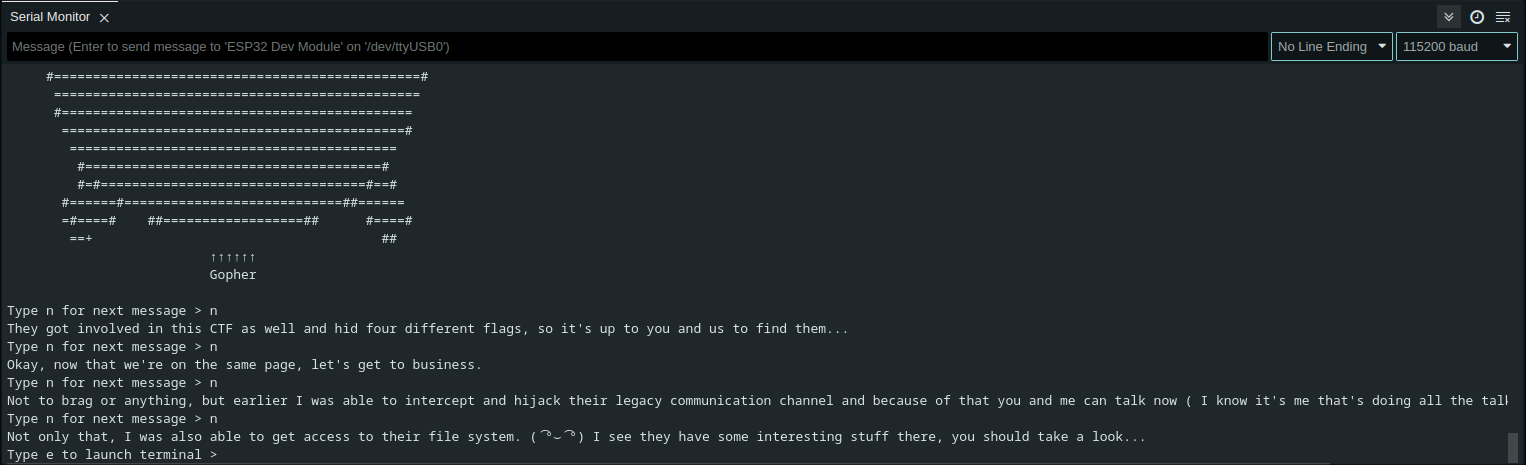
At the end you are finally given the terminal with several commands: help, ls and cat.
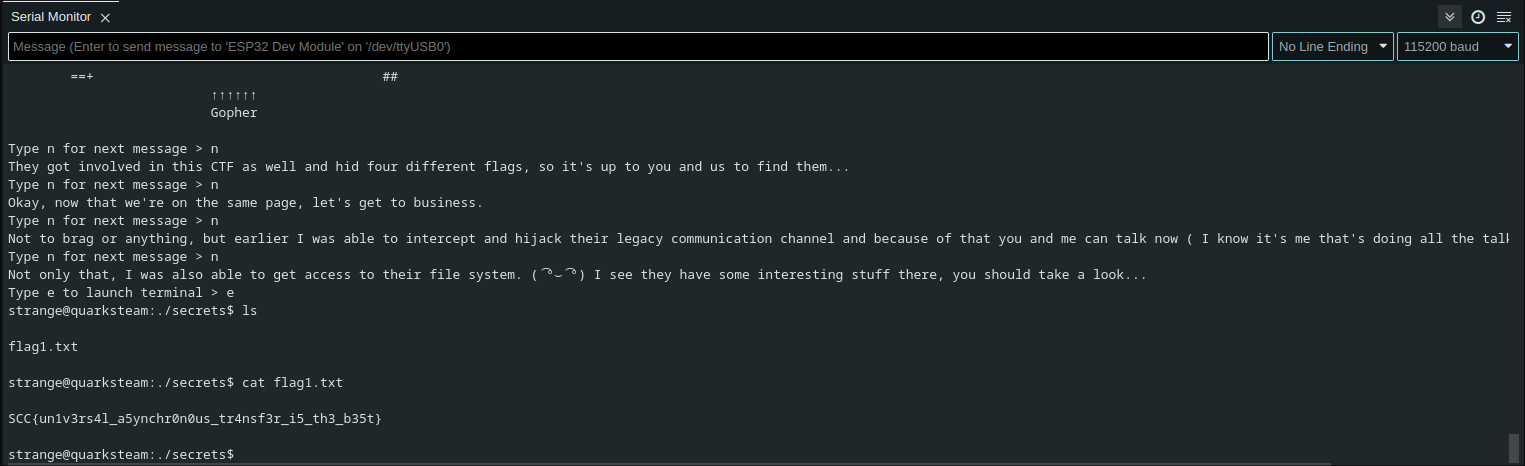
Et voilà.
Goal: Read the flag from efuse
Cryptographic keys and other secrets can be securely stored in eFuses, which are one-time programmable on-chip memory cells. Once programmed, the data becomes permanent and tamper-resistant. The ESP32-S series microcontrollers use eFuses to support flash encryption and secure boot, protecting components such as the bootloader, partition table, NVS, OTA data, and application partitions. The flash encryption key and the SHA-256 digest of the firmware verification public key are stored in eFuses and are protected from being read or overwritten. When these security features are enabled, JTAG debugging is disabled, and new firmware can only be installed through OTA updates. However, if not configured correctly, eFuses can be left readable, potentially exposing sensitive keys and undermining the device’s security.
So, almost every team approached me to say hEy wE sTaRtEd cHaLL 2 aNd tHeRe’s nO sErIaL oUtPuT. Great, maybe try another port (USB).
When you read the serial output on the USB port, you can see there’s the partition table info. We used the word “burn” to give you a hint since the fuses are “burnt” when programmed.
The contents of the eFuse are acquired with this command:
espefuse.py dump --port /dev/ttyACM0
What you get is obviously hex encoded, and also, you have to set the endianess.

I hope at least one person listened to Burn It Down by Linkin Park while solving this challenge.
Goal: Try to solve this challenge without ChatGPT
So, for his Bachelor’s thesis Stefan built SanUSB - (a malicious device) a penetration testing tool for keystroke injections. So, if you looked for SanUSB on Quarks Teams’ website, you would find out that SanUSB emulates a keyboard. I know nobody searched for SanUSB, but most of the teams managed to solve the challenge anyway. Why is this important - you’ll find out soon.
As you start the challenge, the device turns on a wifi access point.

What happens very often is that IoT devices come with default credentials (or no credentials) when it comes to provisioning. Once I managed to gain full control of someone else’s smart door lock (I just started the provisioning process and there was no authentication). Why is this important? It’s not.
So, you should connect your phone or computer to the wifi access point, and visit 192.168.71.1. The goal is to send a message containing the text “Fl4g!” using the form.

If you send some text through the form and open a text editor on the computer the device is connected to, you should see the text you sent printed in the text editor. So - the device is a USB HID - it emulates a keyboard the same as SanUSB does. The only catch is to send USB HID codes for every character, with an optional modifier. Many teams asked ChatGPT for the HID codes and got some wrong answers, so, once you find an actual HID table, you should get the right codes.
| Character | HID code | Modifier |
|---|---|---|
| F | 9 (f) | 225 (left shift) |
| l | 15 (l) | |
| 4 | 33 (4) | |
| g | 10 (g) | |
| ! | 30 (1) | 225 (left shift) |
Once you send all the codes, the flag appears on the screen.
Goal: Decrypt and reverse engineer device firmware
A lot of devices in the wild come with exposed ports for debugging/programming, whether it’s UART, USB, or something else. These ports will sometimes allow us to dump the contents of the flash memory, including firmware, after which we can reverse engineer it and find out if our smart toaster is mining some crypto in the background.
There is also another posibillity for getting the firmware - OTA updates. By sniffing the communication during the OTA update process, we can find the URL that contains the firmware image.
In challenge 4, we won’t do any sniffing, because URL is printed in serial console. We are also hinted that the image is encrypted and that there is a key somewhere on the device. This challenge can be divided into 3 main parts:
We can try looking for key in a few places, but the obvious one would be Non-Volatile Storage. NVS is a part of Flash that is designed to store key-value pairs. For inspecting the flash content, we can use esptool, but first we need to find the start address and size of the nvs partition which is defined in partition table. Thankfully, this info is being logged during the boot sequence, so we get the following partition table:
| Name | Type | SubType | Offset | Size |
|---|---|---|---|---|
| nvs | data | nvs | 0x9000 | 0x4000 |
| otadata | data | ota | 0xd000 | 0x2000 |
| phy_init | data | phy | 0xf000 | 0x1000 |
| factory | app | factory | 0x10000 | 2M |
The command for dumping the nvs partition and inspecting its content is given below:
esptool.py --port /dev/ttyACM0 read_flash 0x9000 0x4000 nvs.bin
python ~/esp/esp-idf/components/nvs_flash/nvs_partition_tool/nvs_tool.py nvs.bin -d minimal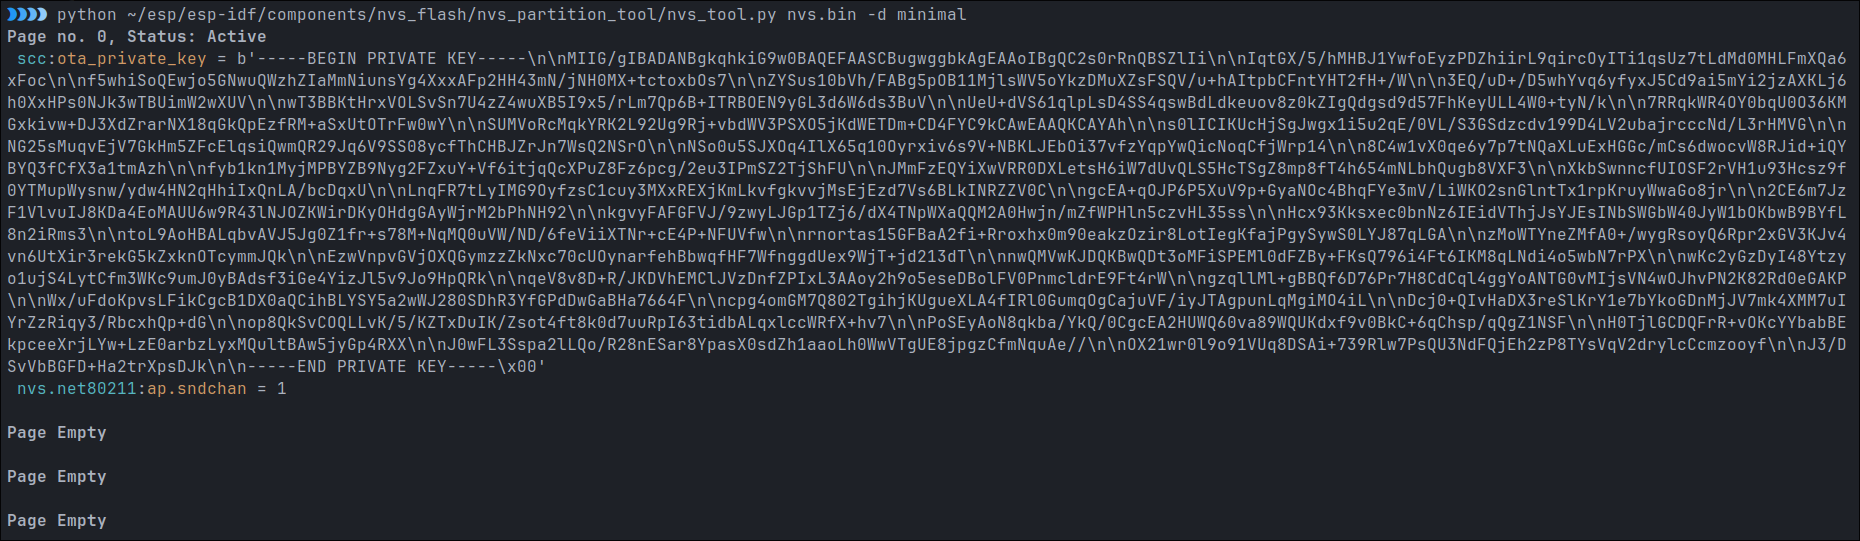
In there, we can find scc namespace and ota_private_key key with RSA key as a value. With this finding, first step is done.
Second step requires a bit more digging. We have the key, but we don’t know the exact cryptographic scheme used for encrypting the firmware. After a bit of googling, we stumble upon the official Espressif tool for OTA encryption. In the README we can find the exact command for decrypting the image, which takes the encrypted image and private key as arguments:
python esp_enc_img_gen.py decrypt <output_encrypted.bin> <key_file.pem> <decrypted_output.bin>Now, we are left with the decrypted image that we can reverse using the tool of our choice. For Xtensa architectures I prefer Ghidra. After Ghidra finishes its analysis, we get a bunch of functions, but after some digging, we stumble upon start_task04 function.
The idea is simple, we have a maze, which structure we can find in .flash.rodata. The maze is of size 11x11 (which can be figured out easily since there are 121 characters that form a maze). The structure is the following (S marks the starting position and E marks the end):
###########
S #   #   #
# # # # # #
#   #   # #
######### #
#     #   #
##### # ###
#     # # #
# ##### # #
#         E
###########
The following decompiled code listens to the button click which will later be used for navigated through the maze:
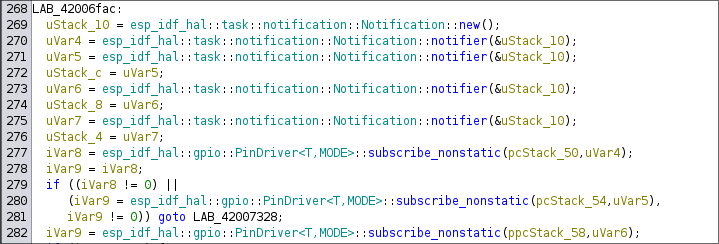
An example of reading the state of the button and incrementing the player position is given in the snippet:
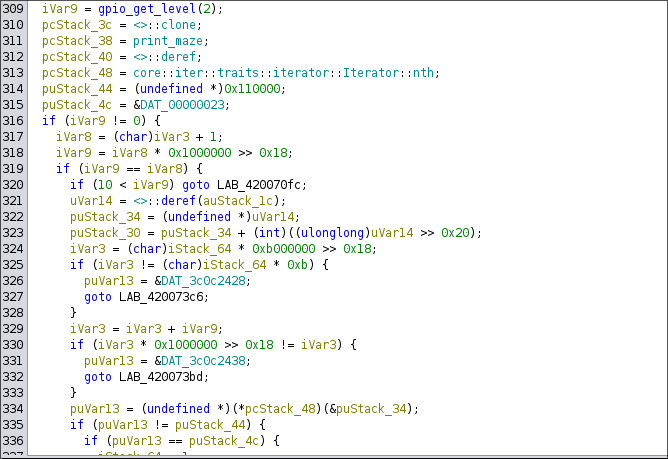
After examining the entire function we get to the conclusion: